Siemens_NX_File_Renaming
Siemens NX File Renaming
Welcome to “NX File Renaming” program’s page.
About
If a NX file is renamed from Windows then the links between the renamed file and it’s assemblies or drawing will be broken. There is a way to rename a NX file from Windows without breaking the links but it is really difficult. Where as it is very simple to do incase of a Solidworks file. You just right click on a solidworks file then rename the file using solidworks context menu. If you rename a solidworks file in this way every part, assembly and drawing file linked to this renamed file will be updated automatically and no link will be broken.

“NX File Renaming” is an endeavour to automate SIEMENS NX which makes the file renaming easy just like that of Solidworks. This Program renames a NX file from windows and keeps the linked files such as Assemblies or Drawings updated.
This Program was written in Python. GUI of this program was solely designed by the help of ‘Bard’, an AI by Google.
To make this program real, initial advise from the owner of “NX Journaling” was crucial to create the layout of the project. Please visit this excellent site, there are lots of NX journals which may make your CAD works easier, smoother and faster.
Secondly, This 15 years old blog post “Renaming components outside of NX” by Hakan Sonmezler, was the essence of this program. Actually, this program just automates the things that were mentioned in the blog post. Check out his blog site. There are many gems to be explored.
If you need any NX related help you may visit this site ENG-TIPS: Siemens NX. Many NX veterans actively participates in this forum. :muscle:
Special Notes before Installing the Program
-
In order to function this program, the NX file that will be renamed and its related files such as assembly and drawing should be in same folder. Otherwise the program won’t find the linked assembly or drawing files. This program is designed in this way to make the process simple. The program could be designed for a whole drive or for whole PC. But this will make the whole process much much slower which is impractical. Morever, the Author of this program follows the convention of keeping all the design files in a same single folder. This makes the design file management task easier. So, the program was designed aligning itself with the convention.
-
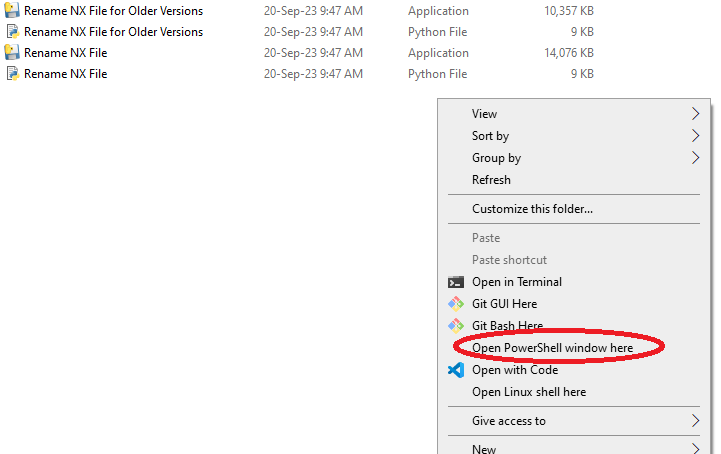
This repository contains two “.exe” file. One is “Rename NX File” which is the recommended program. This program mayn’t work for the NX files that have been saved using NX versions earlier to NX 1953. If it doesn’t work then use the “Rename NX File for Older Versions” exe file instead and follow the installation steps accordingly. This program will work on any nx files regardless of how it has been saved. But this program will be very much slower. The more the number of nx file in the folder, the more slower the program will be. But it will work surely.
How to Install and Run the program?
You can check this Video tutorial or can go through the following Steps-
- Download the files of this repository and save it in your computer
-
In the downloaded folder there are two “.exe” file and two “.py” file. You can just use the “.exe” files or if you wish to modify the code and build your own “.exe” file from the “.py” file then check the next section.
-
Copy or Move the “Rename NX File.exe” in a suitable place. Let’s say put it in C Drive. Now Double click on “Rename NX File.exe” and run it.
-
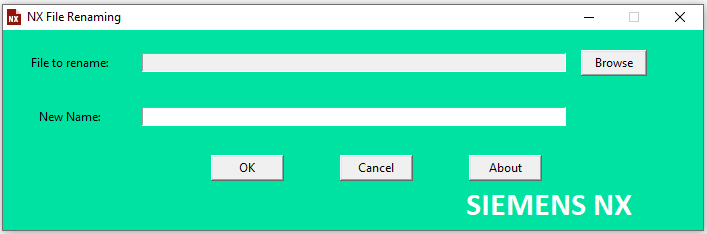
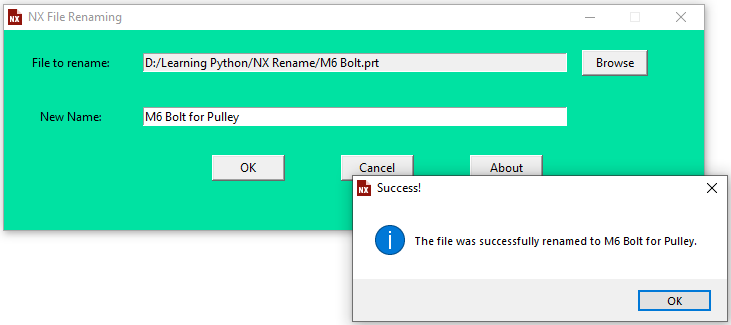
Press Browse button and browse for the NX file that you want to Rename. Add a new name and press OK button. Your NX file will be get renamed. Now open the related assembly or drawing file, you will see that it loaded the renamed file successfuly.
-
Now to rename a NX file by right clicking on the file, windows registry need to be edited. Press ‘Win’ + R and type ‘regedit’. Click OK to open the registry editor and Navigate to HKEY_LOCAL_MACHINE > SOFTWARE > Classes > NXPartFile > shell
-
Right click on “shell” and add a new “key”. Give the name of the key “
Rename NX File”.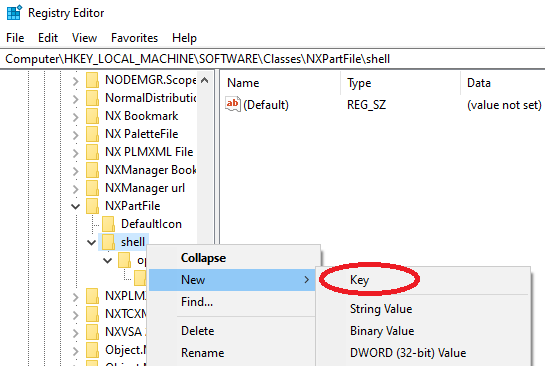
-
Again, Right click on “Rename NX File” and add a new “key”. Give the name of the key “
command”.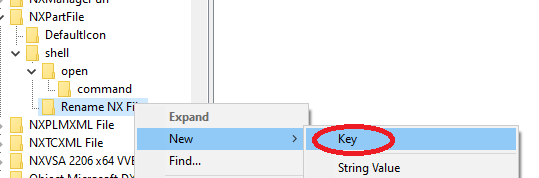
-
Double click on the “Default” and Type
"C:\Rename NX File.exe" "%1"with the double quotes included in the “Value data” field. Press OK.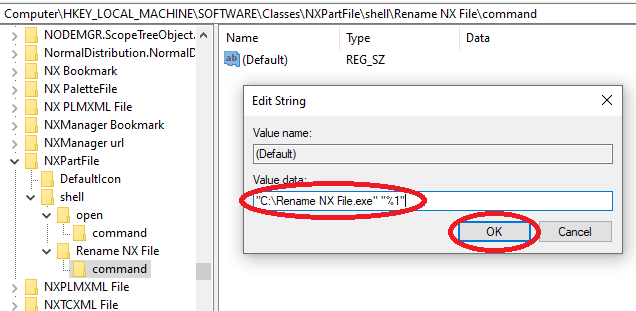
-
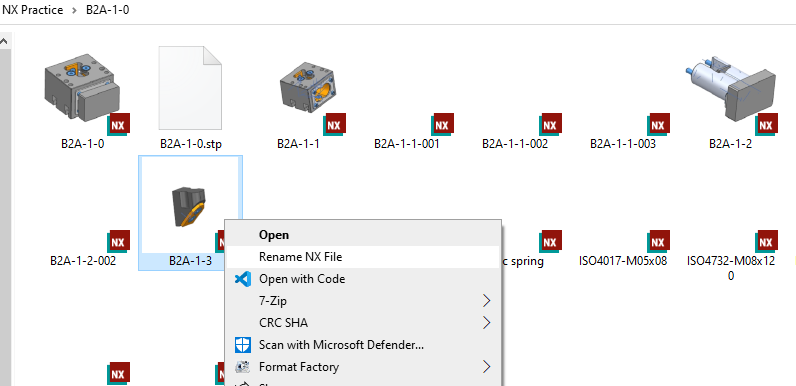
Now, Right Click on the NX file that you want to rename and then click “Rename NX File”.
-
“NX File Rename” program will be loaded with the file name. Now just Add a new name and Press OK.
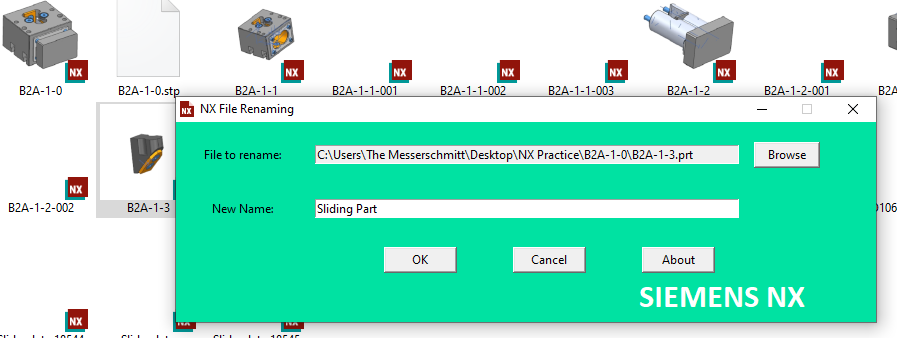
- Now open the related assembly or drawing file, you will see that it loaded the renamed file successfuly.
- Done.
Building Your own executable File from Python file
- Install Python3 on your computer (Python 3.11 Recommended)
- Install “pywin32” in python. To do that open command prompt and type
pip install pywin32and press enter. - Install “Chardet” in python. To do that open command prompt and type
pip install chardetand press enter. - Install “pyinstaller” in python. To do that type in the command prompt
pip install pyinstallerand press enter. -
Now open your downloaded folder. Go to the folder where all the file is located. Press Shift + Right click in the empty space of the folder and click “Open PowerShell Window here”.
-
Type the following code in the power shell and Press Enter. Wait for the process to be completed.
pyinstaller --onefile --windowed --add-data "about_pic.png;." --add-data "nx_rename_icon.ico;." "Rename NX File.py"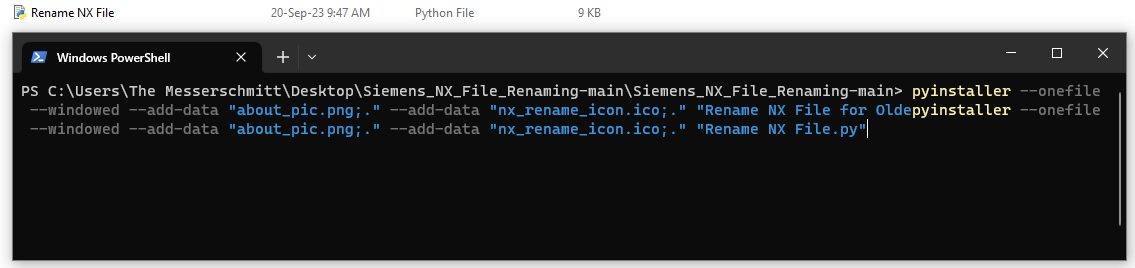
- Now there will be folder by the name “dist”. You will find your executable file there.
- Follow the installation instruction of previous folder to install your exe file.
- Done